
Welcome to the Shaban Walkthrough
After Shaban’s sheep are stolen by thieves, he sets off on an epic adventure to get back what belongs to him. Help Shaban on his journey in this intriguing hidden object adventure game!
Whether you use this document as a reference when things get difficult or as a road map to get you from beginning to end, we’re pretty sure you’ll find what you’re looking for here.
This document contains a complete Shaban game walkthrough featuring annotated screenshots from actual gameplay!
We hope you find this information useful as you play your way through the game. Use the walkthrough menu below to quickly jump to whatever stage of the game you need help with.
Remember to visit the Big Fish Games Forums if you find you need more help. Have fun!
General Tips
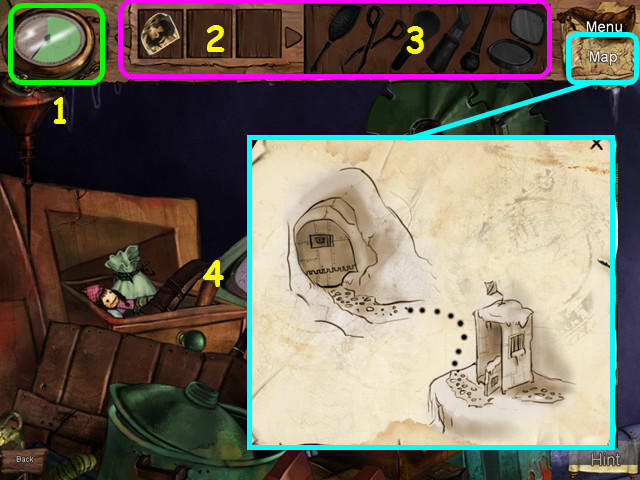
• Hints are unlimited, but you must wait for the meter to refill (1).
• Your inventory (2) and fragmented items (3) to find are located in the upper panel – move your cursor up to lower your inventory.
• You can use the map (4) to travel to locations you have already visited.
Chapter 1: At Home
• You will have the option of a brief tutorial.
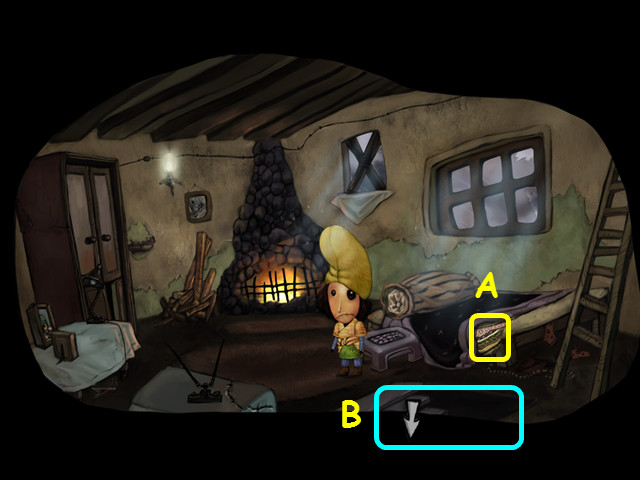
• Take the KNAPSACK (A).
• Walk down the stairs (B).
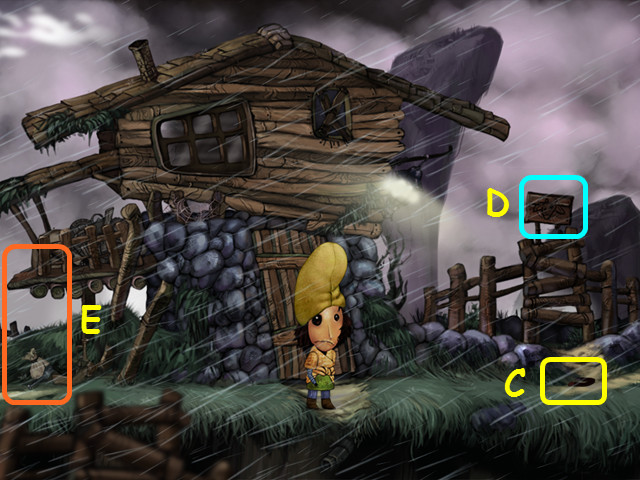
• Take the MAGNET (C).
• Look at the sign over the stall (D).
• Walk all the way to the left (E).
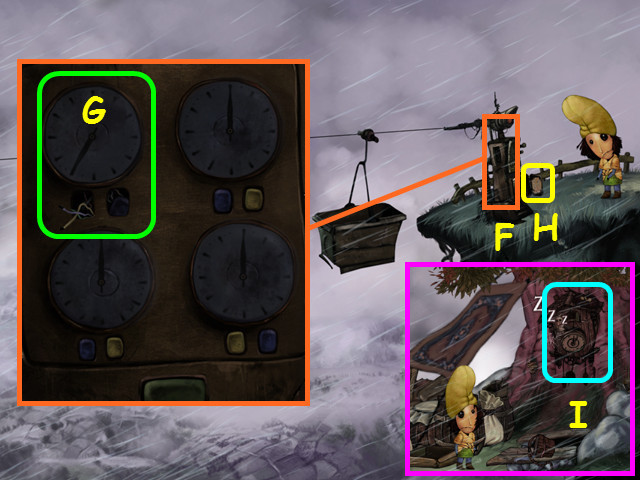
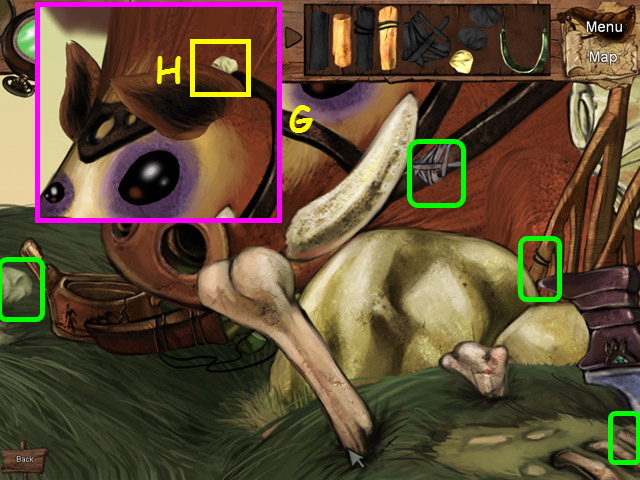
• Look at the transporter control panel (F).
• Note the upper left dial is broken and set to 35 (G).
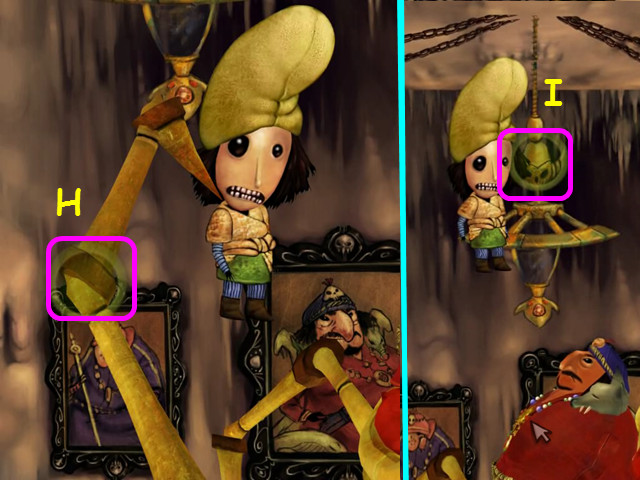
• Take the TRANSPORTER MANUAL (H).
• Walk left until you see the cuckoo clock on the tree.
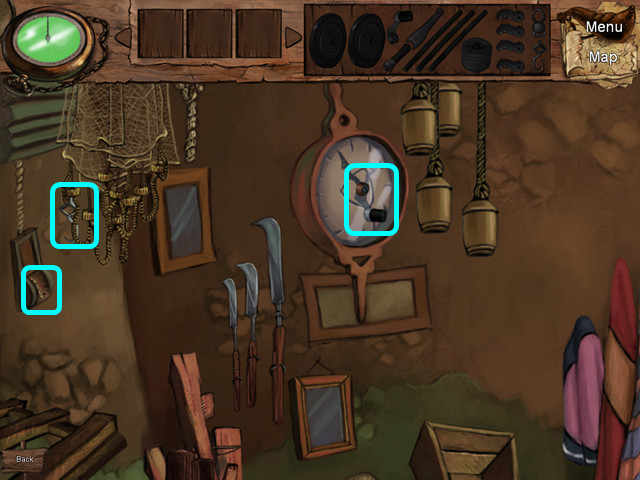
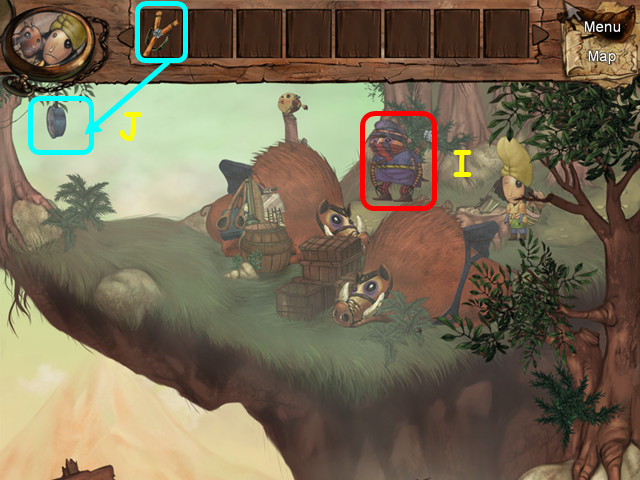
• Select the clock (I).

• Navigate the screen by moving your mouse in the direction you want the screen to move.
• Start by moving it so the clock face is centered on your screen.
• Find 3 pieces of the clock (green).
• Capture the WORM (J).
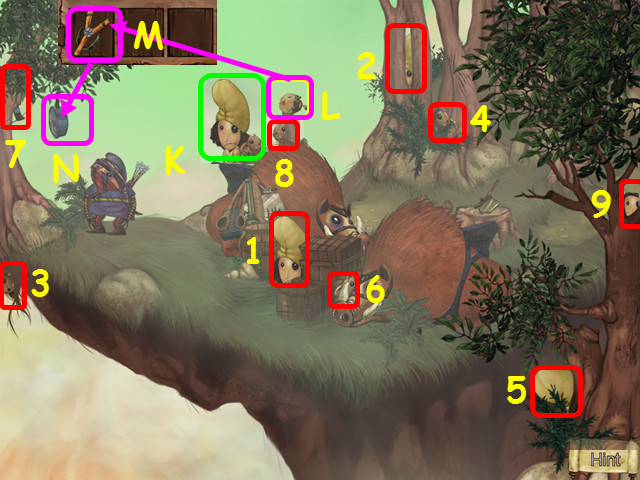
• Combine the WORM with the MAGNET (K), then use the WORM+MAGNET on the hole in the tree (L).
• As the worm crawls by, take another clock piece from him.
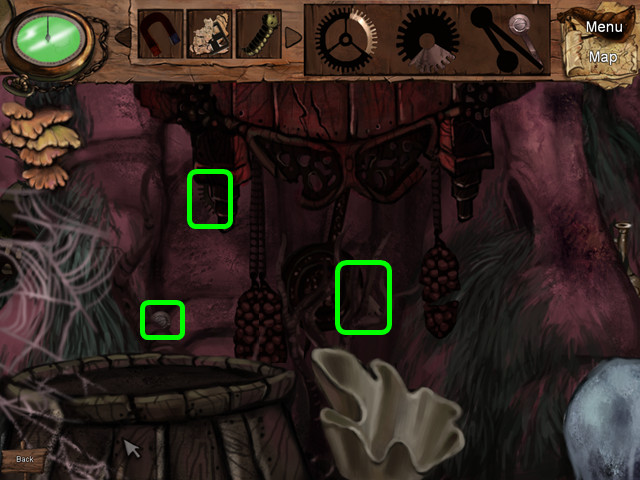
• Move the screen to the bottom left area.
• Find the 3 clock pieces (green).
• Note that one piece is hiding behind the pendulum.
• Move the screen so the clock face is in the upper left.
• Collect the final 2 clock pieces to get A PIECE OF CLOCK (green).
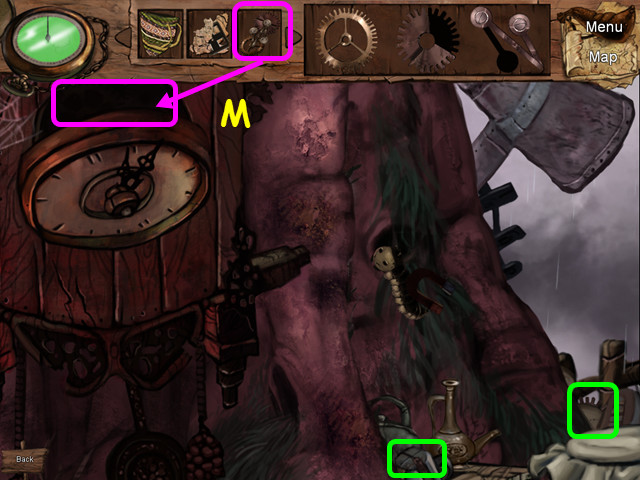
• Place A PIECE OF CLOCK in the hole behind the clock face (M).
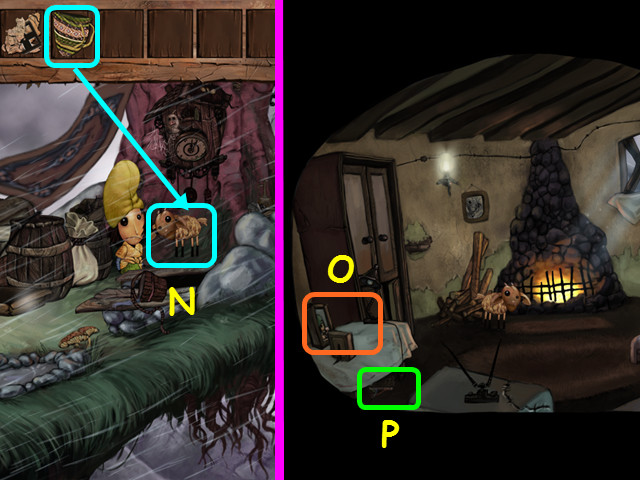
• Use the KNAPSACK on the lamb (N).
• After the cut-scene, you will go automatically to the cottage.
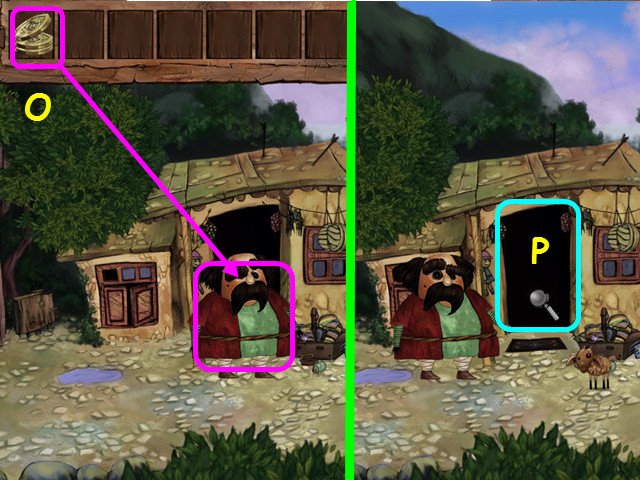
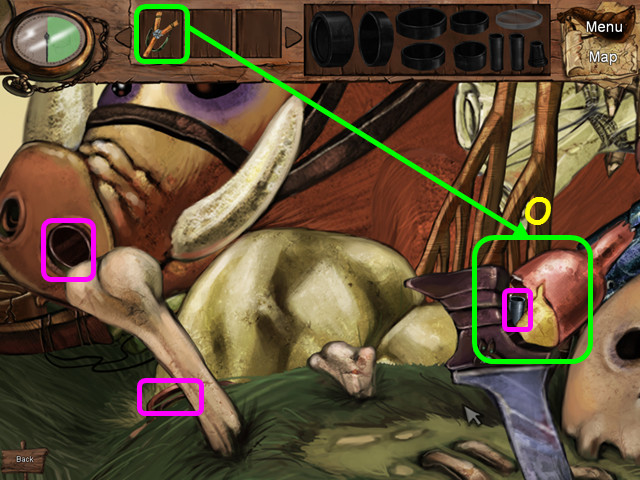
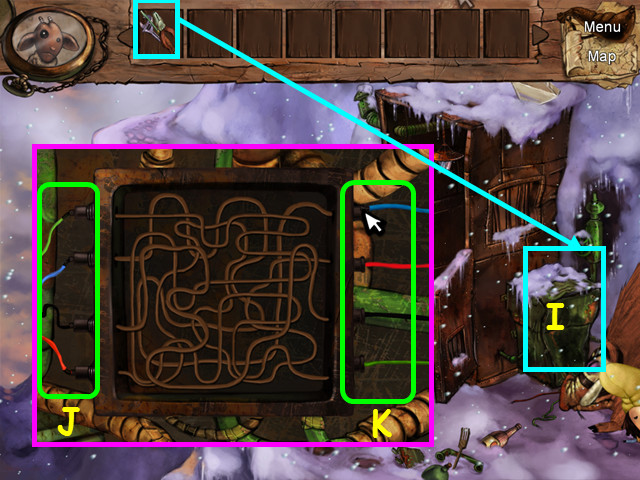
• Note the tabletop (O).
• Look under the table for a mini-game (P).
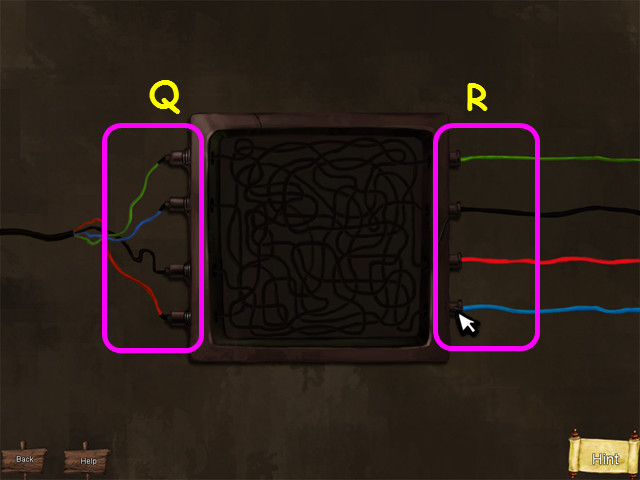
• Follow each wire on the left (Q) to a point on the right (R).
• Place the same colored wire on the end point; left-click to take or place a wire.
• The cottage and the transporter now have power.
• Place the TRANSPORTER MANUAL on the tabletop for a mini-game.
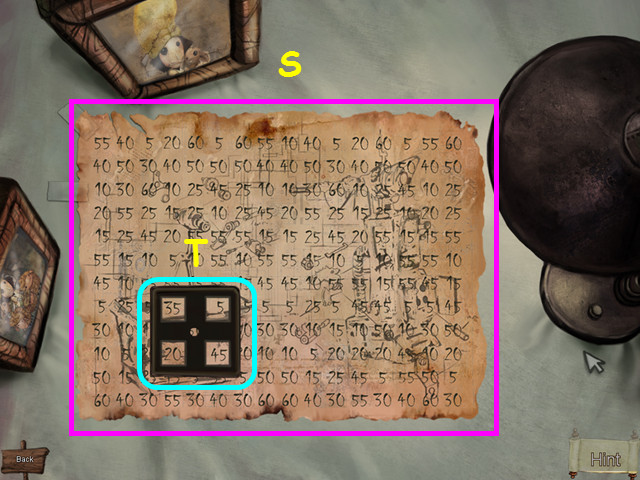
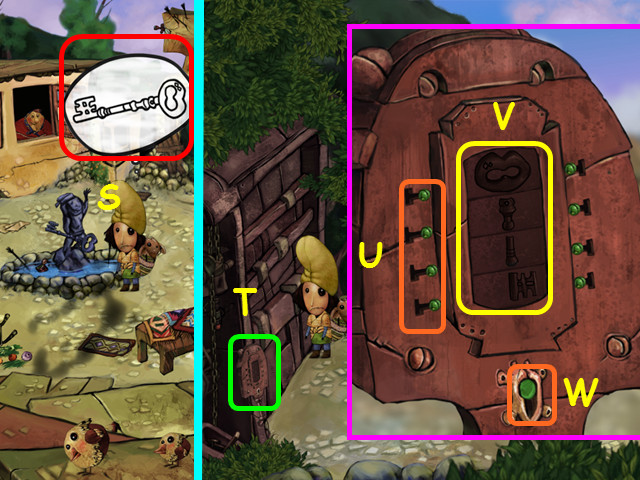
• Restore the page by placing the pieces in the correct position (S).
• Pieces will lock in place when correct.
• Next, place the grid piece on the page to determine the transported settings.
• Since we saw earlier that the upper left dial on the transporter is set to 35, place the grid so 35 is in the upper left box. (T).
• Note the numbers in the other boxes.
• Exit the page and the cottage, then walk left and look at the transporter.
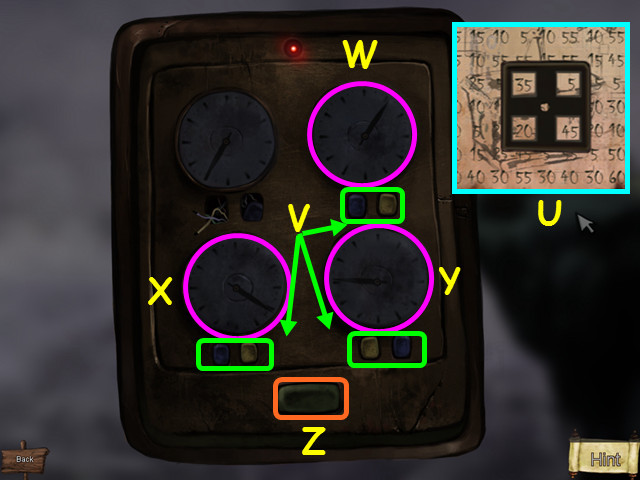
• Set the dials to match the numbers from the manual (U).
• Press the blue buttons to rotate the dial needle counterclockwise and press the yellow button to rotate the dial needle clockwise (V).
• Set the upper right dial to 5 (W).
• Set the lower left dial to 20 (X).
• Set the lower right dial to 45 (Y).
• Press the green button (Z).
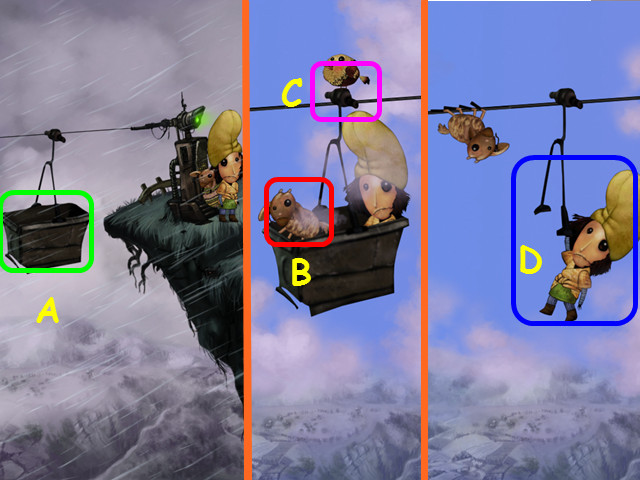
• Select the bucket to use the transporter (A).
• After the transporter stops working, select the lamb twice so he ends up on the wire (B).
• Next select where the bucket is hanging from the wire (C).
• Shaban should be hanging by one hand now (D).
• Travel to the left.
Chapter 2: The Village
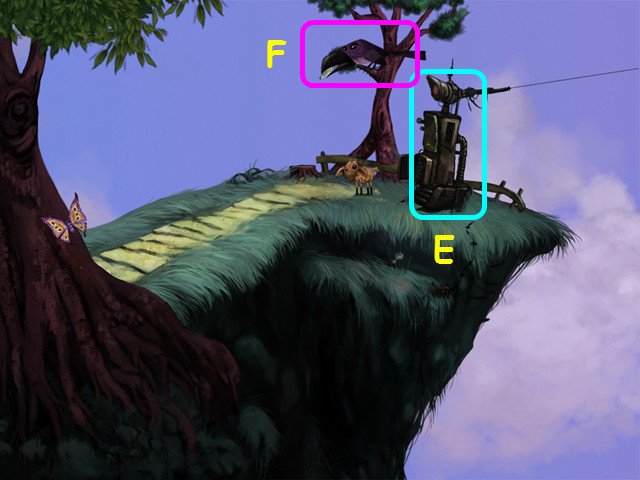
• Look at the transporter to learn it needs a part (E).
• Talk to the crow; he wants a fish for the part (F).
• Walk left, go over the bridge to the village; continue left past the burning building.
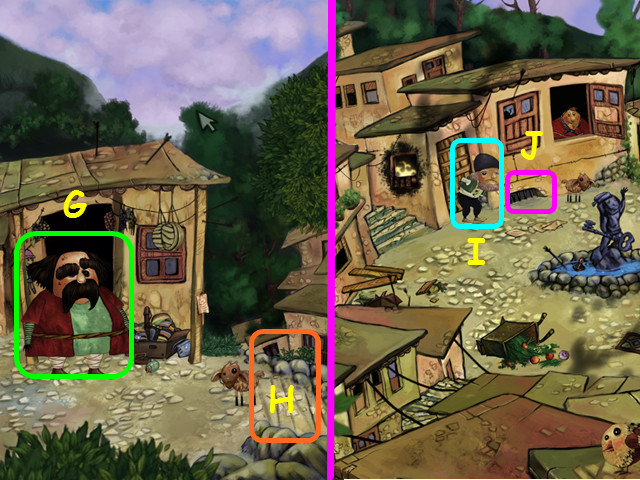
• Ask the merchant about a fishing pole (G).
• Walk right to return to the village (H).
• Talk to the old man to learn he wants his walking stick and glasses (I).
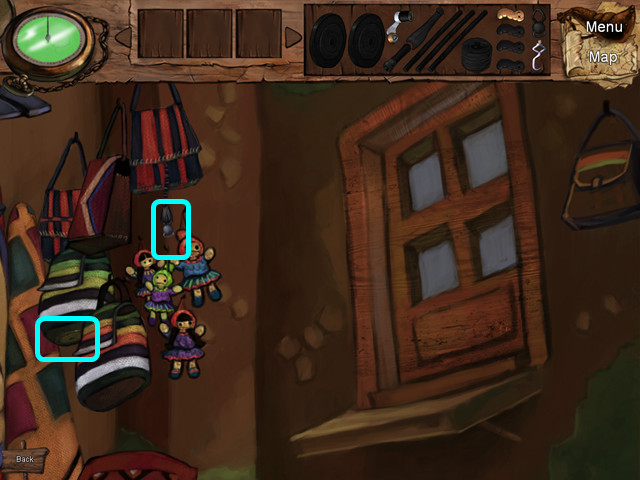
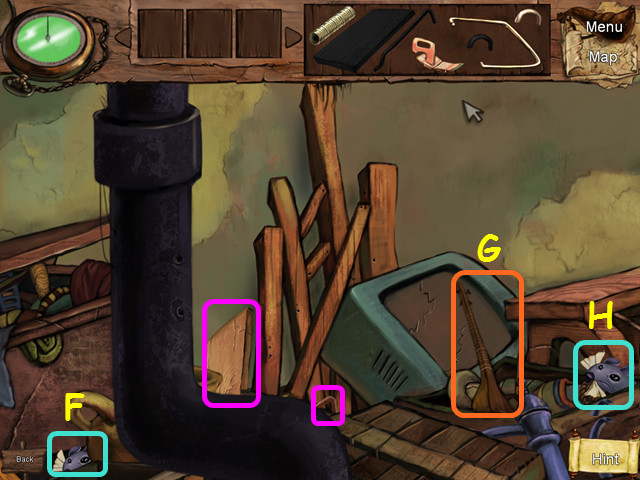
• Look in the cellar window (J).
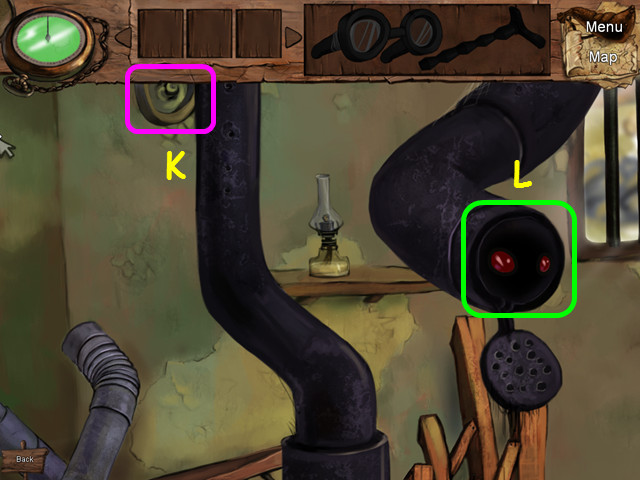
• Move the screen to look at the upper left corner.
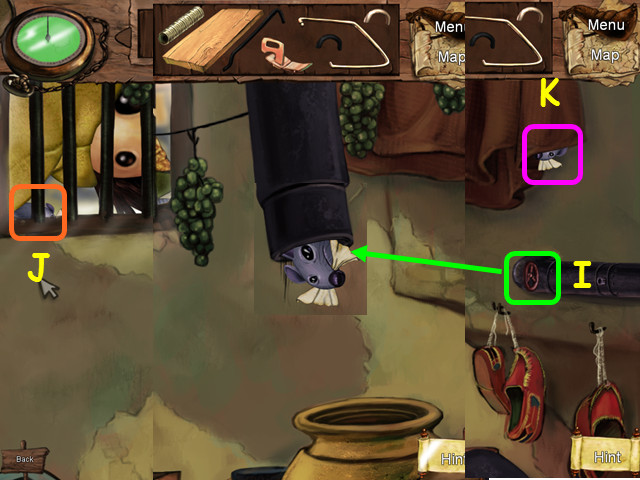
• Take the piece of the glass + walking stick (K).
• Startle the critter in the pipe; he will drop a needed piece (L).
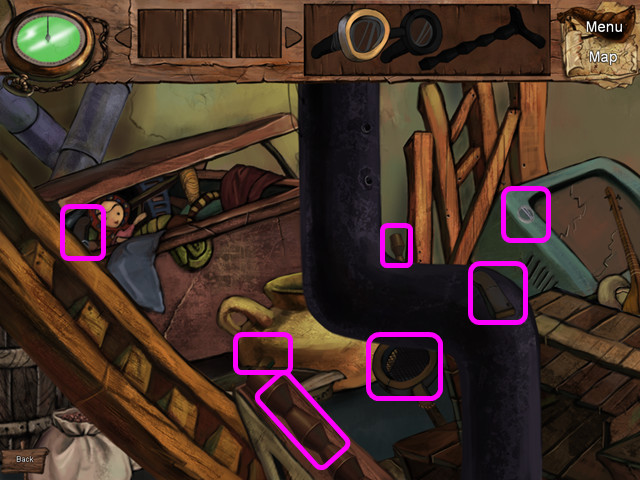
• Move the screen to view the lower left.
• Find 7 more pieces of the glass + walking stick (pink).
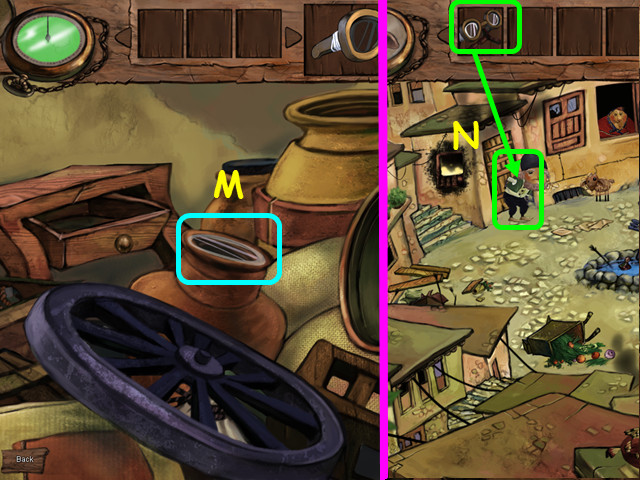
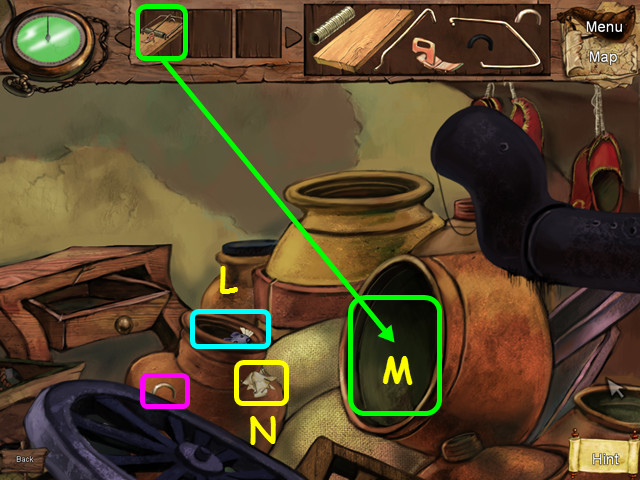
• Move the screen to view the lower right area.
• Take the final piece of the GLASS + WALKING STICK (M).
• Give the GLASS + WALKING STICK to the old man and he will give you a COIN (N).
• Walk to the left.
• Give the COIN to the merchant (O).
• Enter the shop (P).
• Move the screen to the upper left.
• Locate the 3 pieces of the fishing rod (aqua).
• Move the screen to the upper right.
• Locate the 2 pieces of the fishing rod (aqua).
• Move the screen to the lower left.
• Locate the 5 pieces of the fishing rod (aqua).
• Move the screen to the lower right.
• Locate the final 4 pieces of the FISHING ROD (aqua).
• Walk to the right until you are on the bridge.
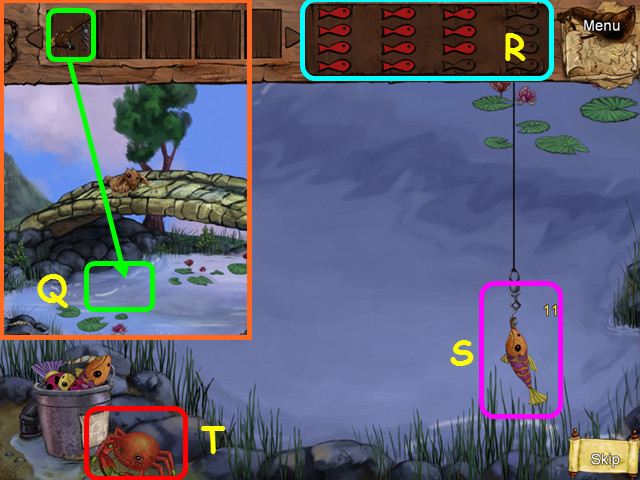
• Use the FISHING ROD on the water for a mini-game (Q).
• You must capture 16 fish (R); click on a fish when it jumps out of the water (S).
• Do not capture the crabs jumping out of the water. Doing so will deduct one fish from your total.
• Watch your bucket in the lower left; hit the crabs that try to steal more fish (T).
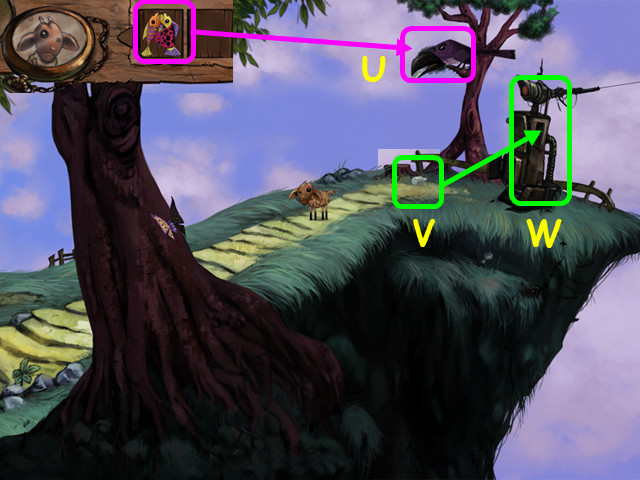
• Give the FISH to the crow (U).
• Take the FUSE the crow drops (V), then use the FUSE on the transporter (W).

• Walk left to the bridge; take the EMPTY BUCKET (A).
• Walk left to the village.
• Use the EMPTY BUCKET on the fountain to get the BUCKET FILLED (B).
• Use the BUCKET FILLED on the flames (C).
• You will go automatically back to the cellar.
• Move the screen to the upper left.
• Find the 2 pieces of the rattrap (pink).
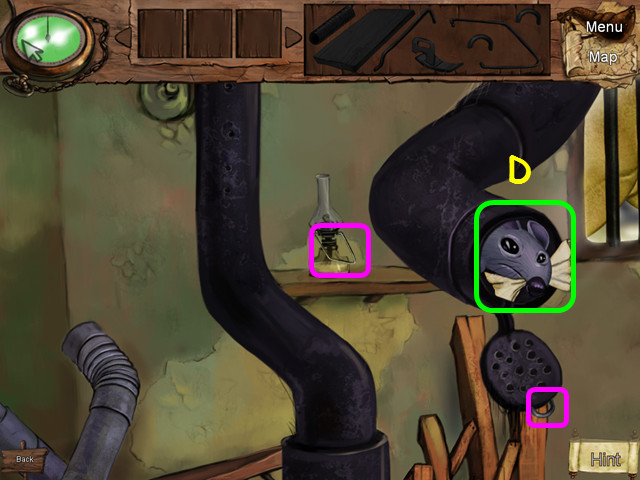
• Try to catch the rat (D).

• Move the screen to the upper right.
• Find the 2 pieces of the rattrap (pink).
• Try to catch the rat (E).
• Move the screen to the lower left, then toward the center a bit.
• Find the 2 pieces of the rattrap (pink).
• Try to catch the rat (F).
• Strum the lute (G), then try to grab the rat when he shows his head (H).
• Move to the upper right and turn on the red valve to flush the rat from the pipe (I).
• Move to the upper center and try to catch the rat in the window (J).
• Move back to the upper right and try to catch the rat in the cloth (K).
• Move the screen to the lower right.
• Take the final piece of the RATTRAP (pink).
• Try to catch the rat (L).
• Use the RATTRAP on the pot (M).
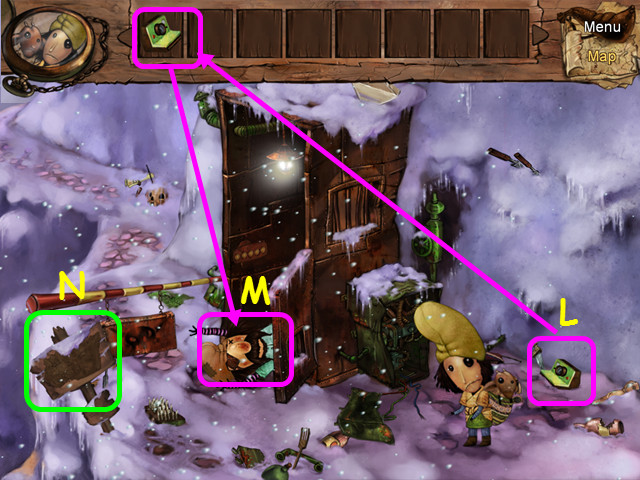
• Take the ROAD MAP (N).
• Walk to the left.
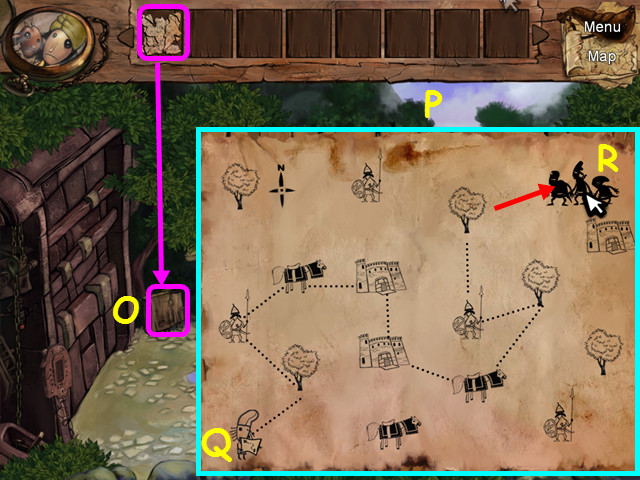
• Place the ROAD MAP on the sign for a mini-game (O).
• Restore the map jigsaw style; left-click to take/place and right-click to rotate a piece.
• Pieces will lock into place when correct (P).
• Once the map is whole, determine the path from Shaban (Q) to the bandit’s hideout (R).
• Select icons on the map to form the path; if you choose incorrectly, you must restart the path.
• Walk to the right.
• Look at the statue’s key and note the pattern (S).
• Walk back to the left and look at the gate control (T).
• Use the small green buttons (U) to change the key pieces until it matches the statue’s key (V).
• Press the large green button (W).
Chapter 3: The Forest
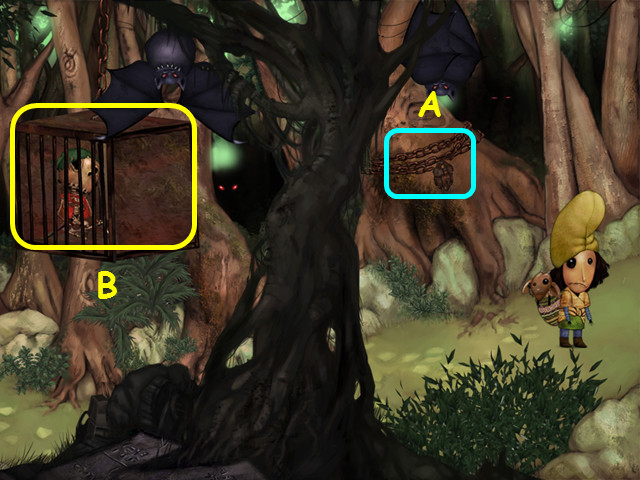
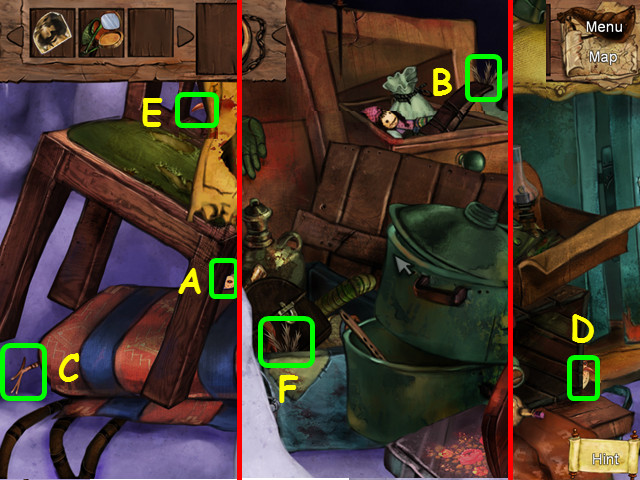
• Note the lock on the tree (A).
• Note the hanging cage (B).
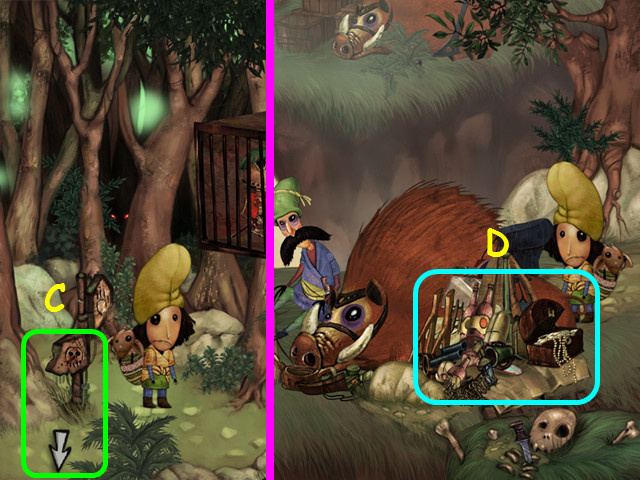
• Walk left until you see a road sign, then walk down to the lower camp (C).
• Look at the junk pile next to the beast (D).
• Move the screen to the upper right.
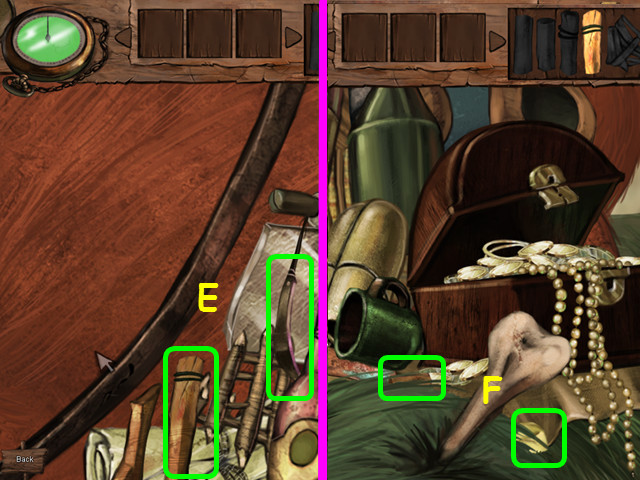
• Find the 2 pieces of the slingshot (E).
• Move the screen to the lower right.
• Find the 2 pieces of the slingshot (F).
• Move the screen to the lower left.
• Find the 4 pieces of the slingshot (green).
• Move the screen up to look at the ears (G).
• Move the ear and quickly take the final piece of the SLINGSHOT (H).
• Walk to the right, then walk up at the signpost to the upper camp.
• Note the rustler you want to distract (I).
• Use the SLINGSHOT on the pan (J).
• Shaban must sneak to the bird; select his hiding places in numerical order (1-9).
• Once Shaban is standing close (K), take the BIRD (L).
• Combine the BIRD and the SLINGSHOT (M), then use the SLINGSHOT+BIRD on the pan (N).
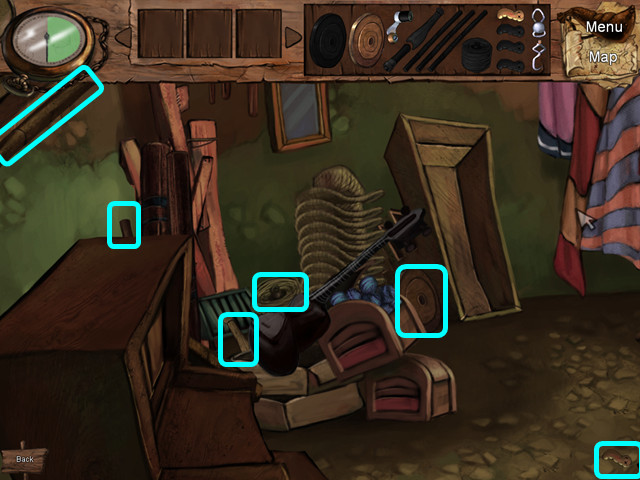
• After the cut-scene, select the junk pile next to the beast at the lower camp.
• Move the screen to the lower left.
• Use the SLINGSHOT on the bottle (O).
• Find the 3 pieces of the telescope (pink).
• Move the screen to the lower right.
• Find the 4 pieces of the telescope (pink).
• Move the screen to the upper right.
• Find the 3 final pieces of the TELESCOPE (pink).
• Walk up to the upper camp (P).
• Use the TELESCOPE on the back of the sign and take the 1st TORN PAPER (Q).
• Walk down to the lower camp (R).
• Use the TELESCOPE on the front of the sign and take the 2nd TORN PAPER (S).
• Combine the 2 pieces of TORN PAPER to get the PAPER.
• Exit the close-up of the sign.
• Use the PAPER on the sign for a mini-game.
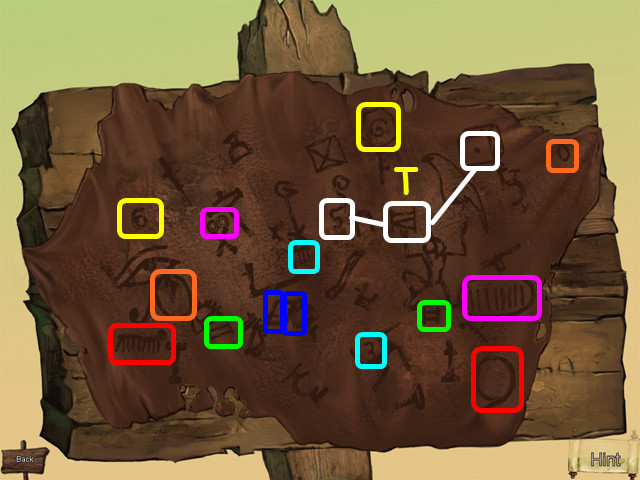
• Select matching pairs of numbers.
• The solution will show in white: 5 – IV – 1 die (T).
• Walk right until you can see the lock.
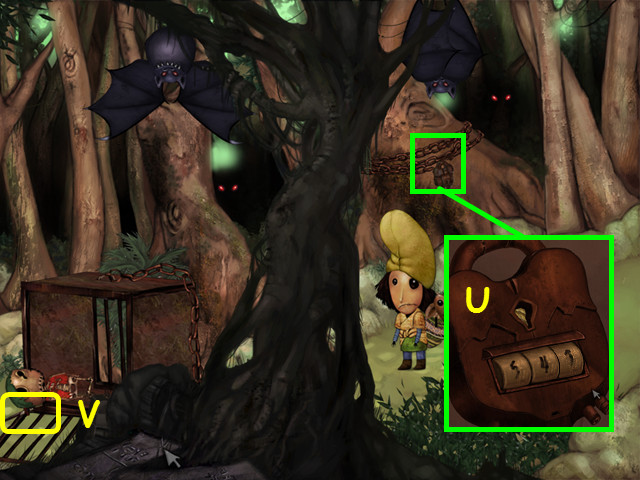
• Look at the lock and enter the combination: 5-4-1 (U).
• After the cage falls, take the SWORD (V).
• Walk down to the lower part of the camp.
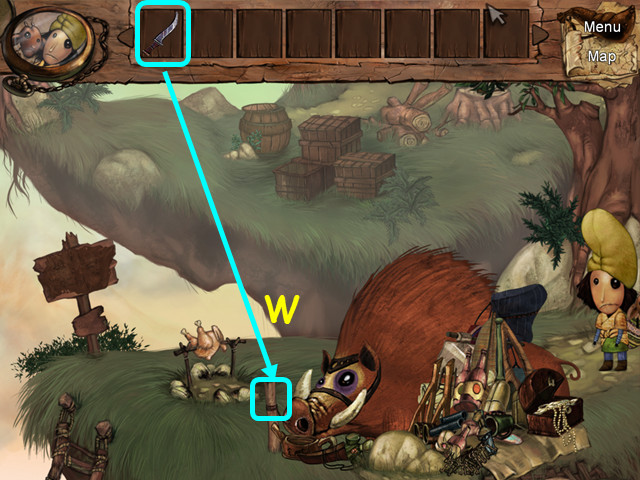
• Use the SWORD on the rope to cut the beast free (W).
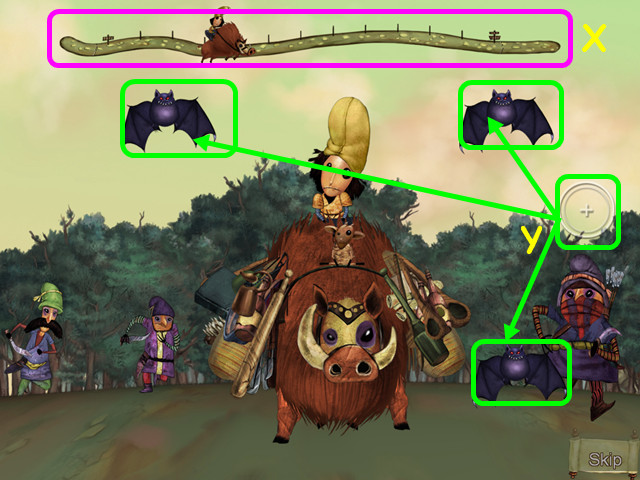
• Shoot down the bats as they appear to fill up the meter at the top (X).
• Move your cursor (Y) over each bat and click to fire.
• If you miss the bats you will lose some ground on the progress meter.
Chapter 4: The Mountains
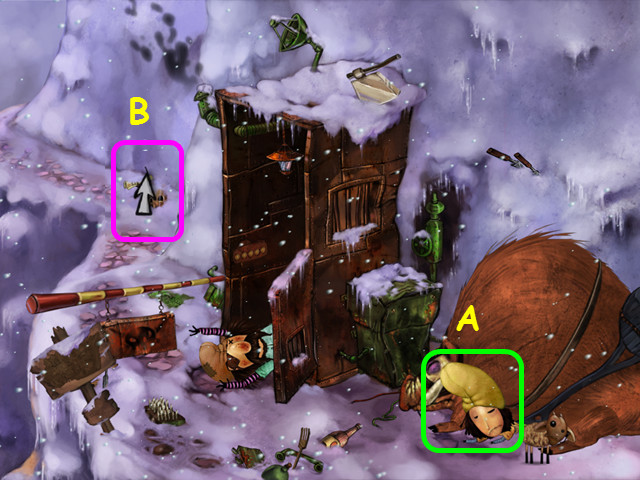
• See that Shaban is stuck under the beast (A).
• Walk up the mountain (B).
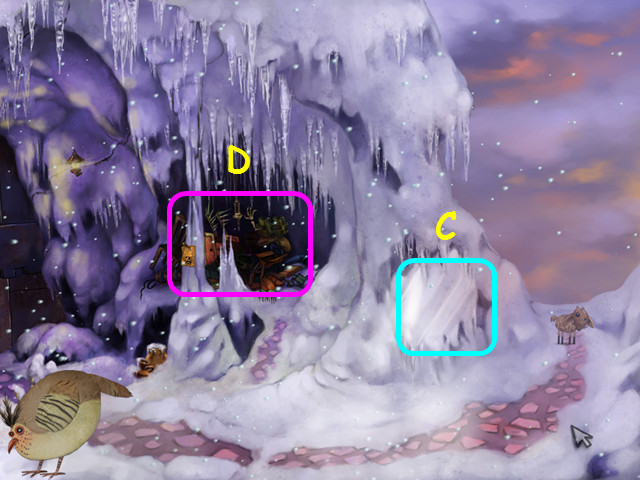
• Note the ice (C).
• Select the junk pile (D).
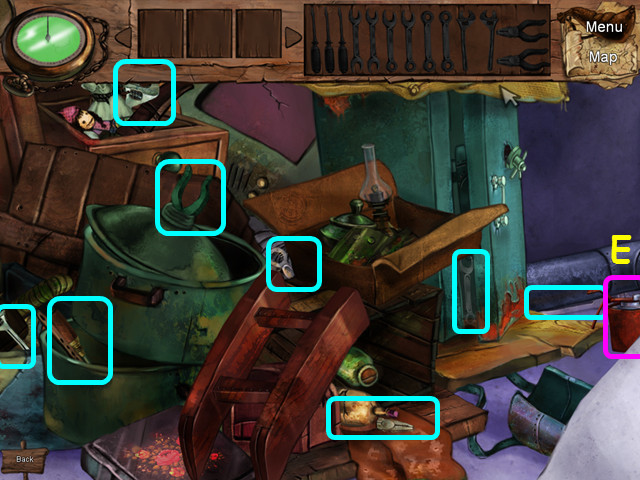
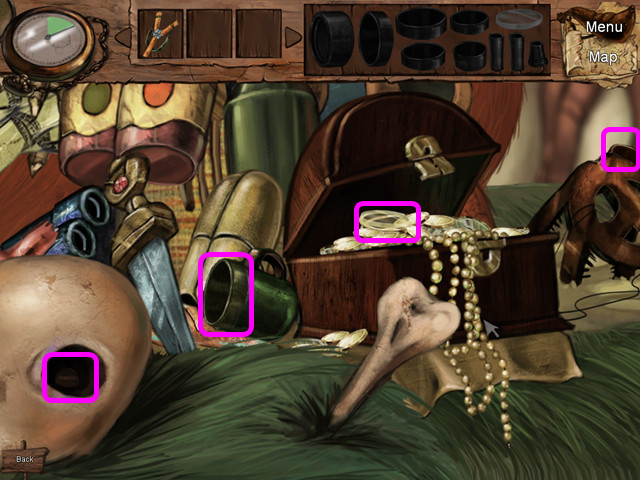
• Move the screen to the lower right.
• Take the SAUCEPAN (E).
• Find the 8 pieces of the toolbox (aqua).
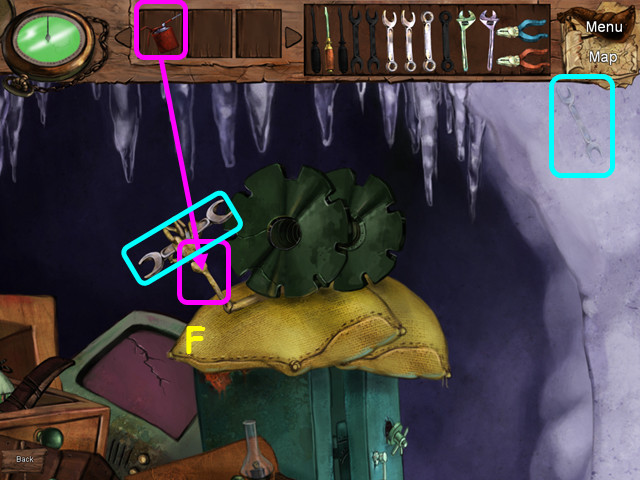
• Move the screen to the upper right.
• Use the SAUCEPAN on the skeleton hand (F).
• Take the 2 pieces of the toolbox (aqua).
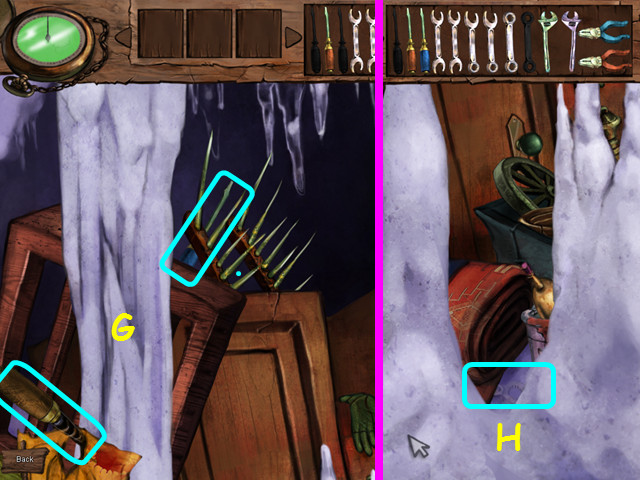
• Move the screen to the upper left.
• Take the 2 pieces of the tool box (G).
• Move the screen down so you can see the right end of the rug.
• Take the final piece of the TOOL BOX (H).
• Walk up on the right to return to where Shaban is trapped.
• Use the TOOL BOX on the generator for a mini-game (I).
• Follow each wire on the left (J) to a point on the right (K).
• Place the same colored wire on the end point; left-click to take or place a wire.
• Take the CAMERA (L) and use it on the unconscious man (M) to get the THIEF PHOTO.
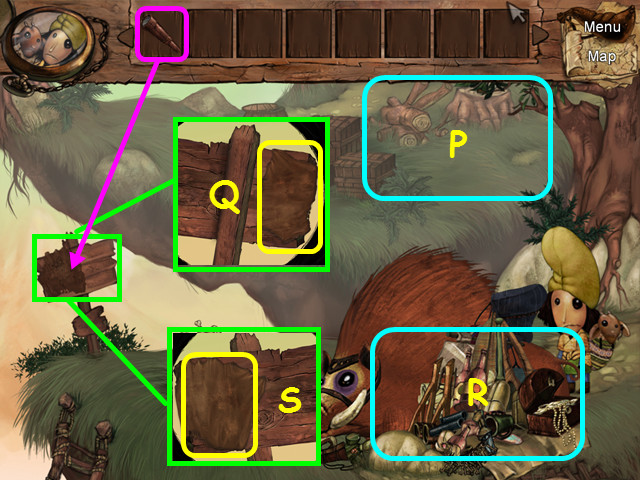
• Look at the road sign for a mini-game (N).
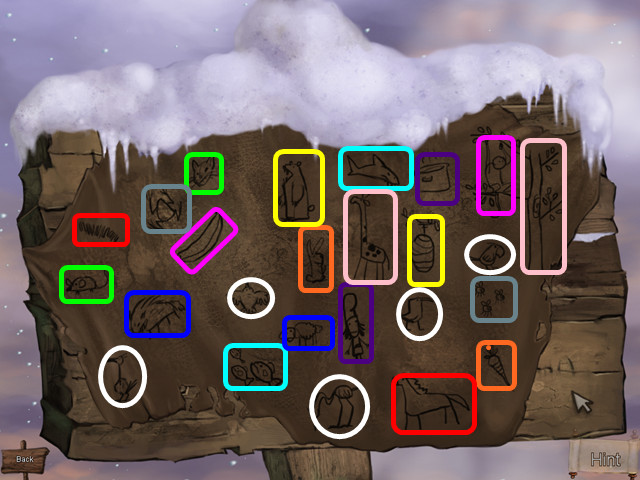
• Restore the page jigsaw-style.
• Right-click to rotate a piece, left-click to take or place.
• Pieces will lock into place when correct.
• Find pairs of items that go together like cat and mouse or giraffe and tree.
• The remaining 5 birds are a clue (white).
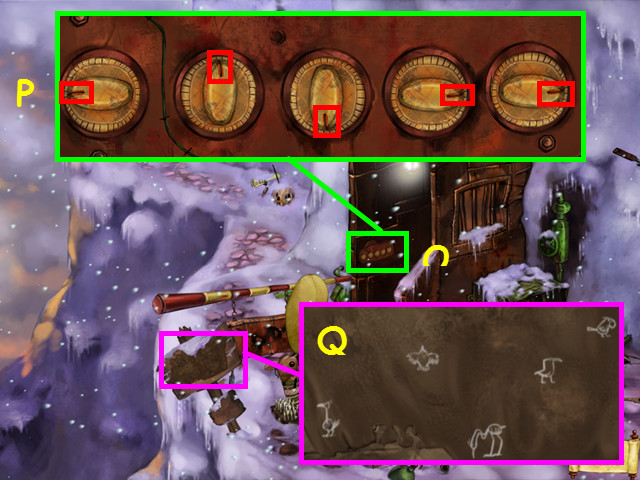
• Look at the controls in the sentry hut (O).
• Turn the knobs (P) so they point in the same direction as the birds in the clue (Q).
• Walk up the mountainside.
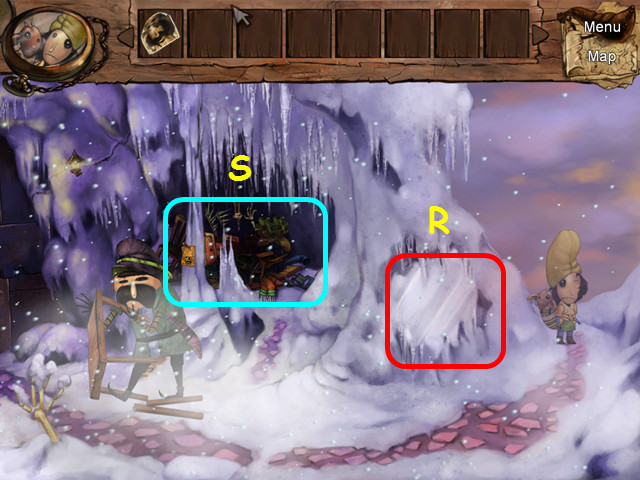
• Look at the ice to learn you need to wipe it clean (R).
• After the cut-scene, select the junk pile (S).
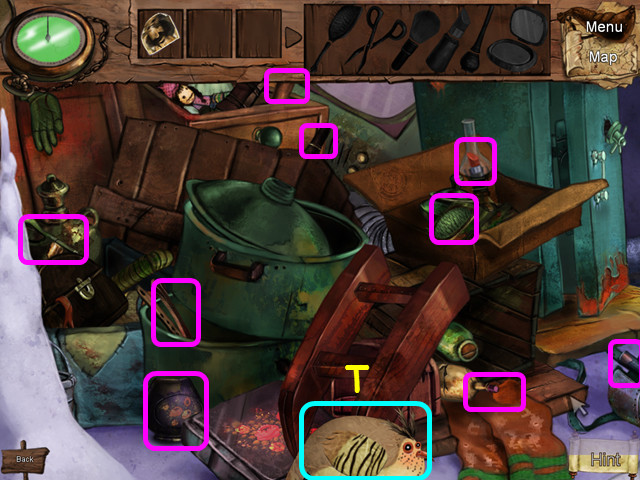
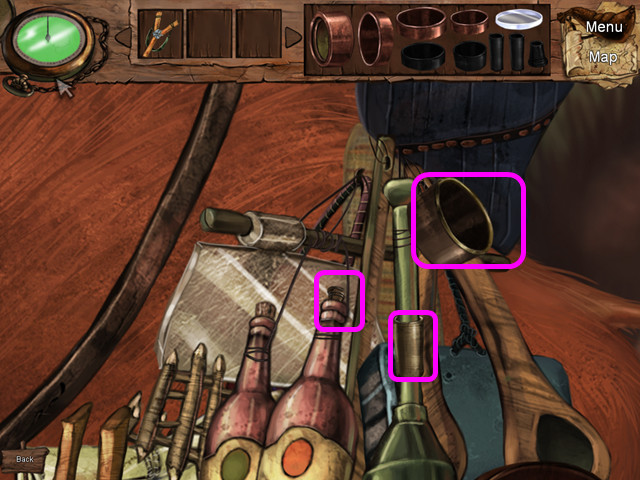
• Move the screen to the lower right.
• Try to catch the bird (T).
• Find the 9 pieces of cosmetics (pink).
• Move the screen to the upper left.
• Try to catch the bird (U).
• Find the piece of cosmetics (pink).
• Move the screen to the upper right.
• Try to catch the bird (V).
• Find the final 2 pieces of COSMETICS (pink).
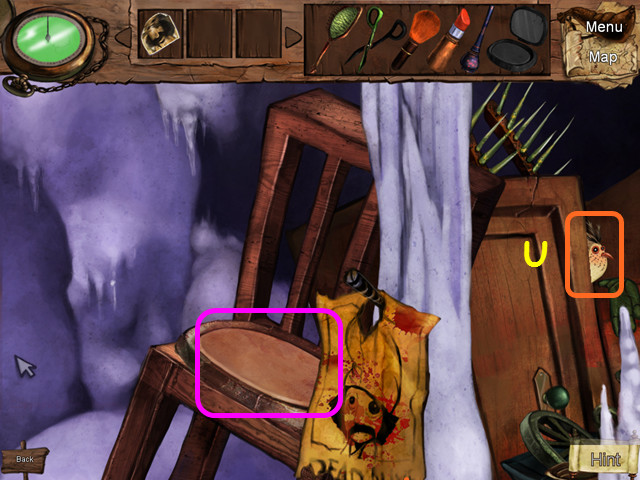
• You must now continue chasing the bird.
• Try to catch the bird lower left area, behind the chair (A).
• Look upper right, by the TV; try to catch the bird (B).
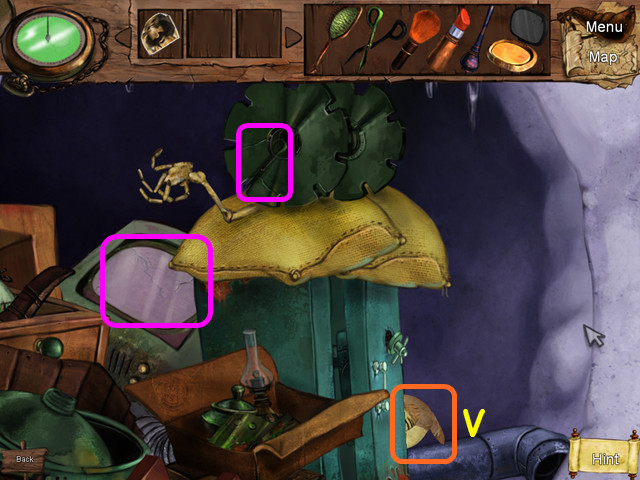
• Try to grab the bird in the lower left at the end of the rug (C).
• Move to the lower right and try to catch the bird (D).
• Look behind the back of the chair on the right; try to catch the bird (E).
• Try to catch the bird bottom center (F).
• You will earn the FEATHERS.
• Select the ice to the right of the junk pile.
• Use the FEATHERS to clear the ice (G).
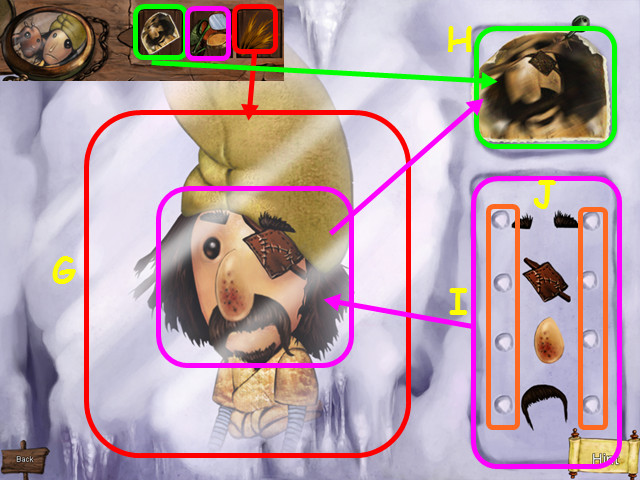
• Place the THIEF PHOTO in the upper right square (H).
• Place the COSMETICS below the photo (I).
• Use the buttons in the cosmetics to change Shaban’s appearance to match the photo (J).
Chapter 5: The Caves

• Chase the lamb around until he lands on the 1st cage (1-3).
• Look at the sign on the cage for a mini-game (A).
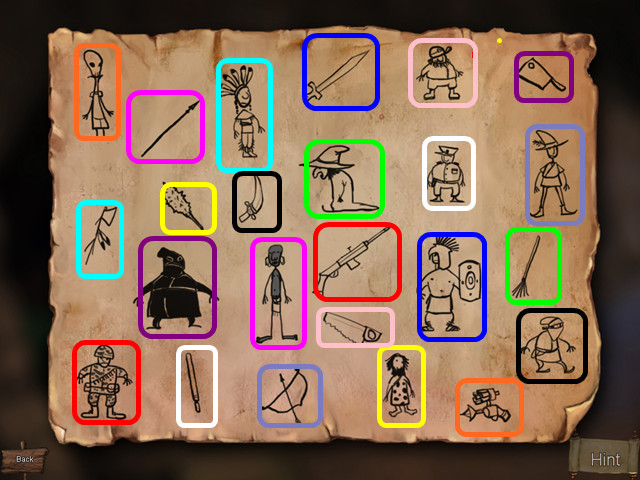
• Match people to the weapons they would use.
• Find all the pairs to get the combination clue.
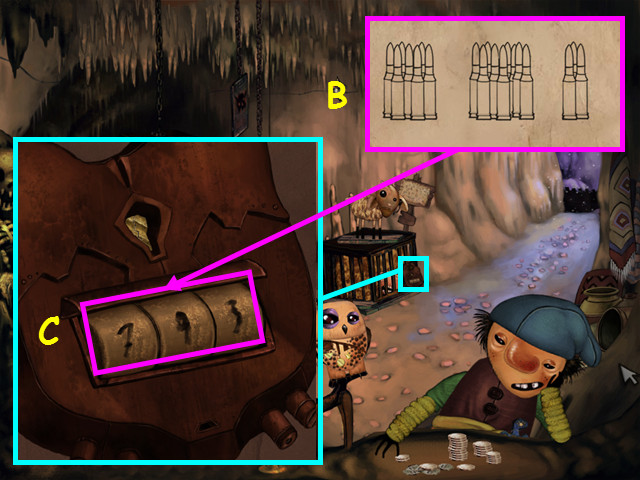
• Count the number of bullets on the clue to get 7-9-3 (B).
• Look at the padlock and enter the code to free the sheep (C).
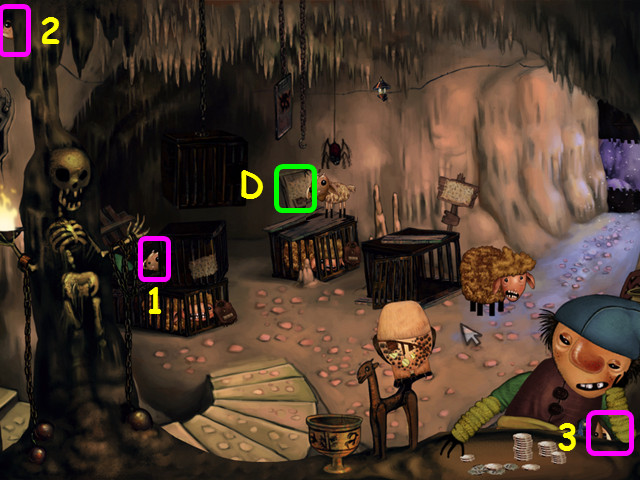
• Chase the lamb around until he lands on the 2nd cage (1-3).
• Look at the sign on the cage for a mini-game (D).
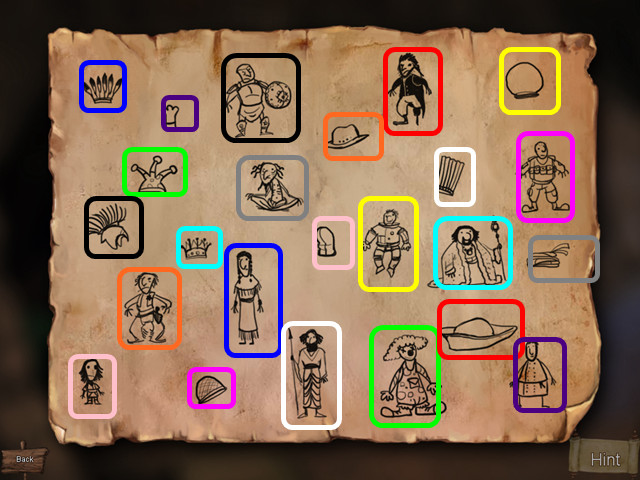
• Match people to the headgear they would wear.
• Find all the pairs to get the combination clue.
• Count the number of decorations on each hat to get on the clue to get 6-3-5 (E).
• Look at the padlock and enter the code to free the sheep (F).
• Chase the lamb around until he lands on the third cage (1-3).
• Look at the sign on the cage for a mini-game (G).
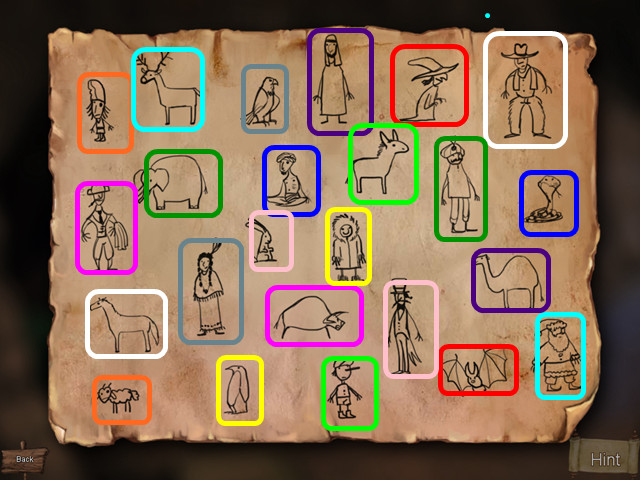
• Match people to the animal they would be associated with.
• Find all the pairs to get the combination clue.
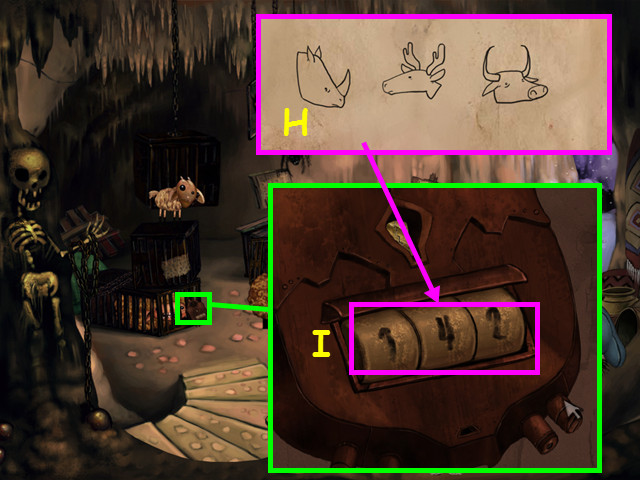
• Count the number of horns on the clue to get 1-4-2 (H).
• Look at the padlock and enter the code to free the sheep (I).
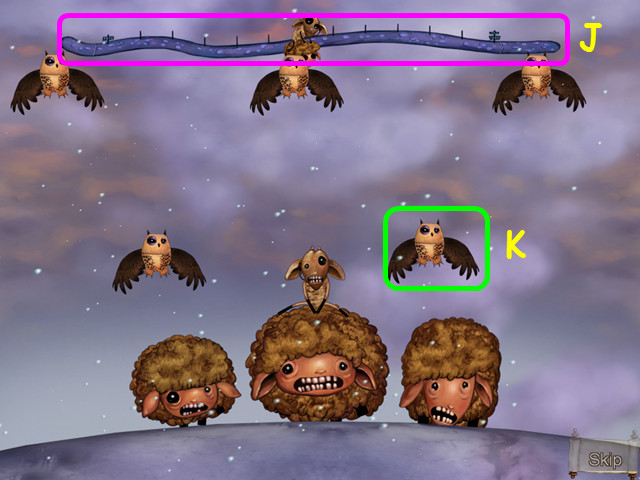
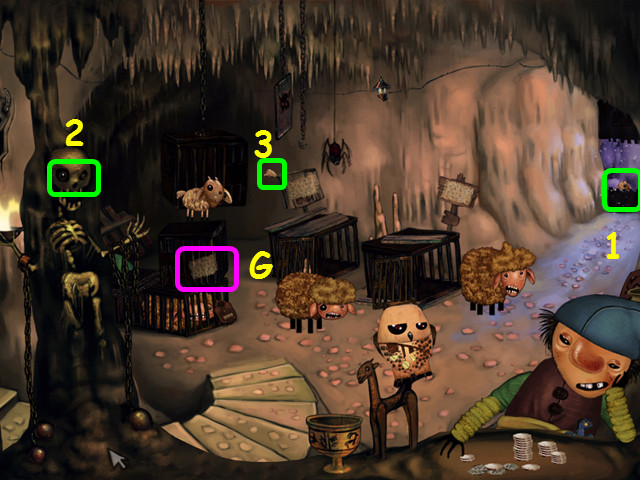
• Shoot down the owls as they appear and fill up the meter at the top (J).
• Move your cursor over each owl and click to fire (K).
• If you miss the owls you will lose some ground on the progress meter.
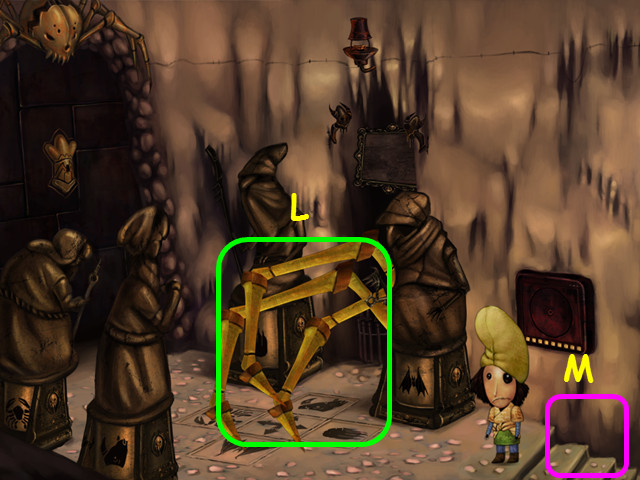
• Note the spider legs blocking the way (L).
• Walk down (M).
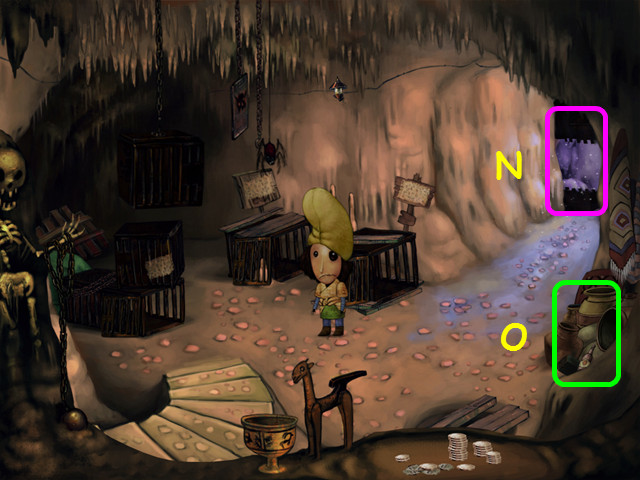
• Note the cave entrance (N).
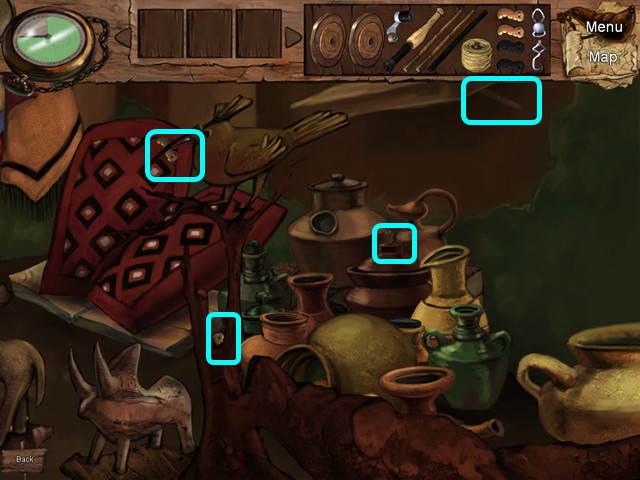
• Select the pots (O).
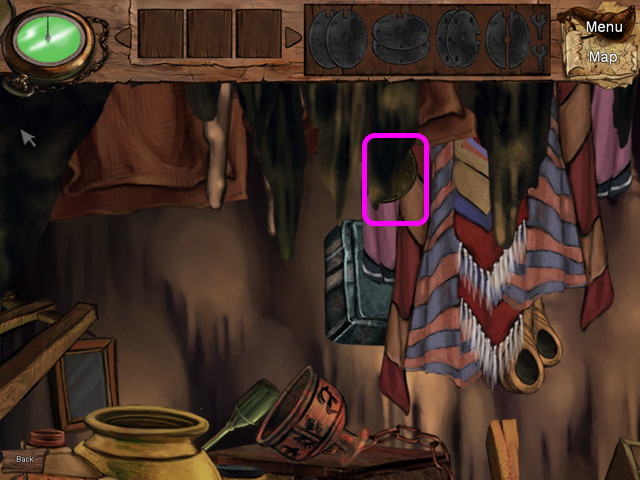
• Move the screen to the upper left and take the piece of plates (pink).
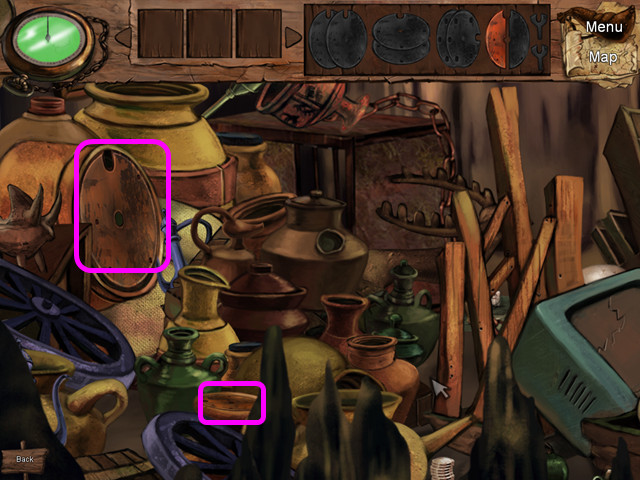
• Move the screen to the lower left and take the 2 pieces of plates (pink).
• Move the screen to the lower right and take the 5 pieces of plates (pink).
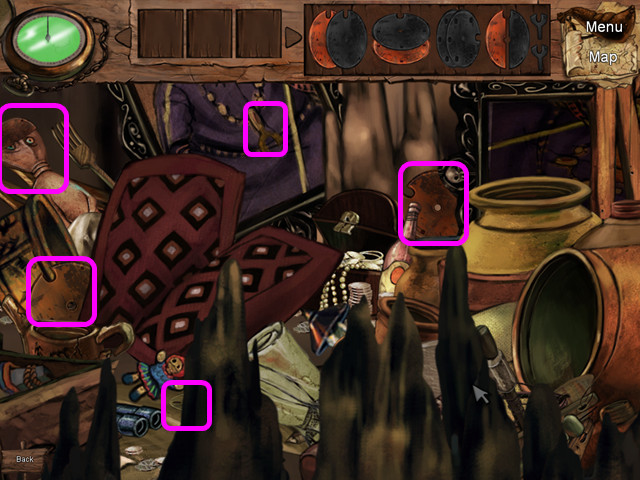
• Move the screen to the upper right and take the final 2 pieces of plates (pink).
• Walk to the left and go up the stairs.
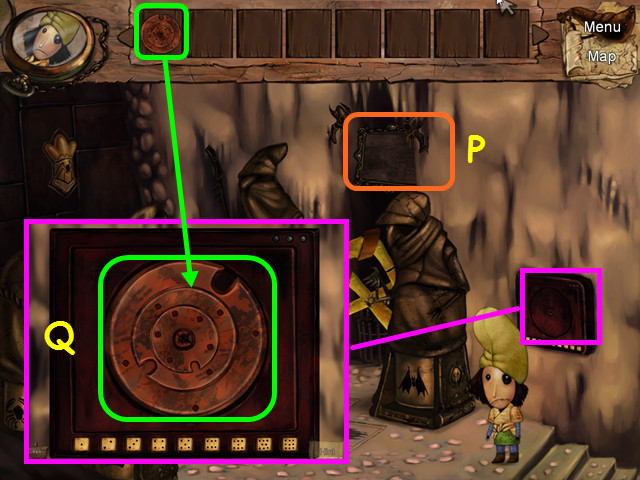
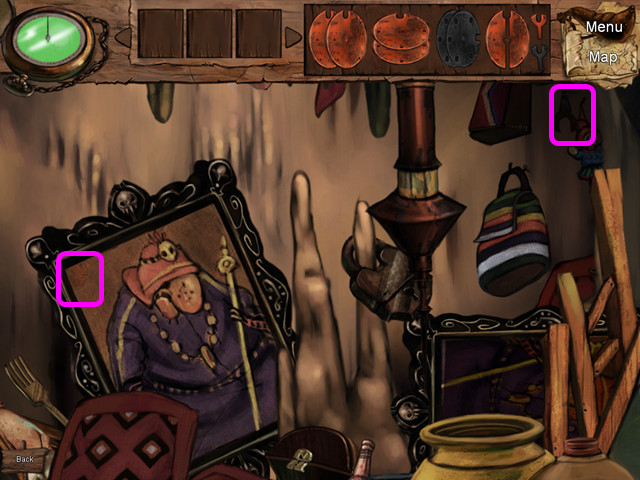
• Note the empty frame (P).
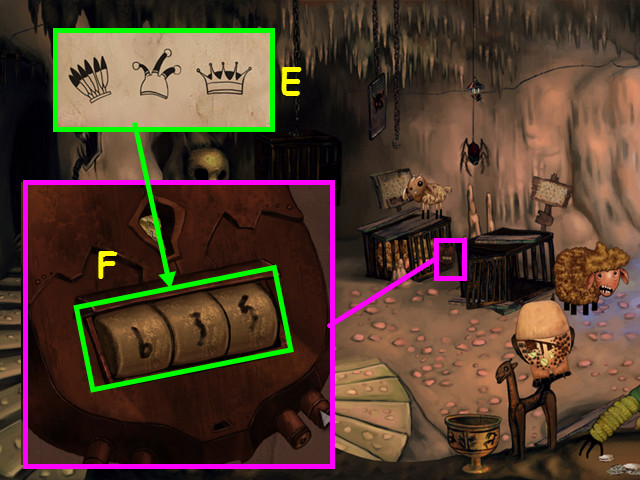
• Look at the control panel and use the PLATES on the center for a mini-game (Q).
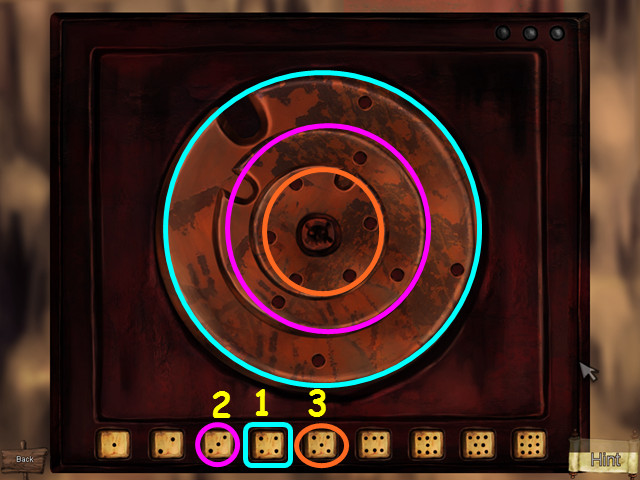
• Press the dice that have the same number of dots as the dice (1-3).
• Note that the outer plate actually has 4 holes; one is only visible when the 2nd plate spins the notch over the hole.
• You have received a ROYAL PICTURE; place the ROYAL PICTURE in the frame for a mini-game.
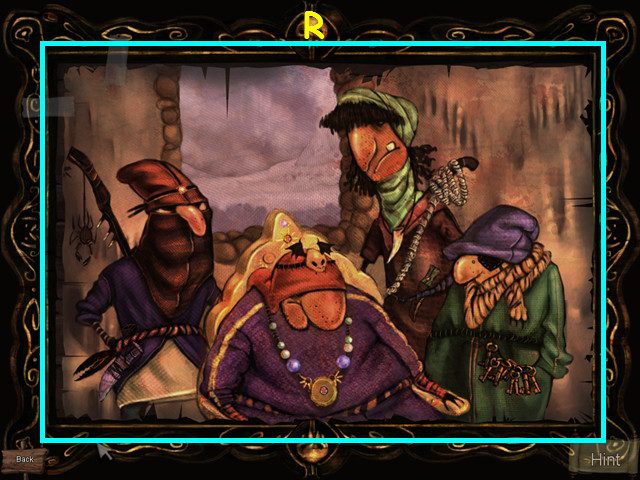
• Restore the picture in this jigsaw style mini-game (R).
• Left-click to take or place a piece, and right click to rotate a piece.
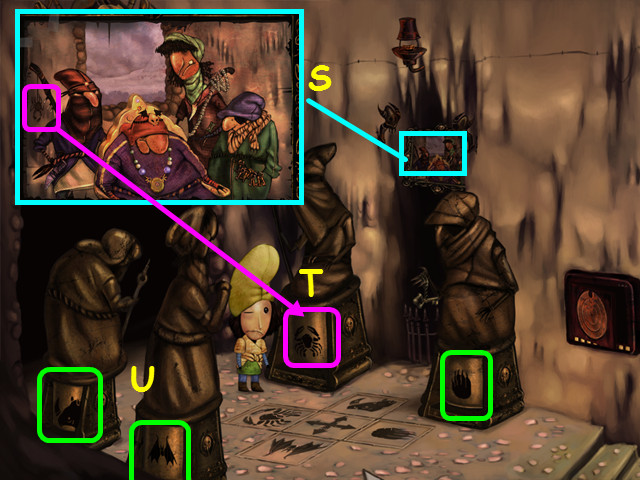
• Refer to the Royal Picture (S).
• Turn the statue bases to reflect its owner (T).
• Note the 2 statues on the left face away from you, so you must put their symbol on the other side (U).
• From left to right the symbols should be: rhino-bat-crab-claws.
• Walk left through the now open door.
• Select the green circles as they appear to do battle.
• Missing the green circles in a sequence will cause it to restart.
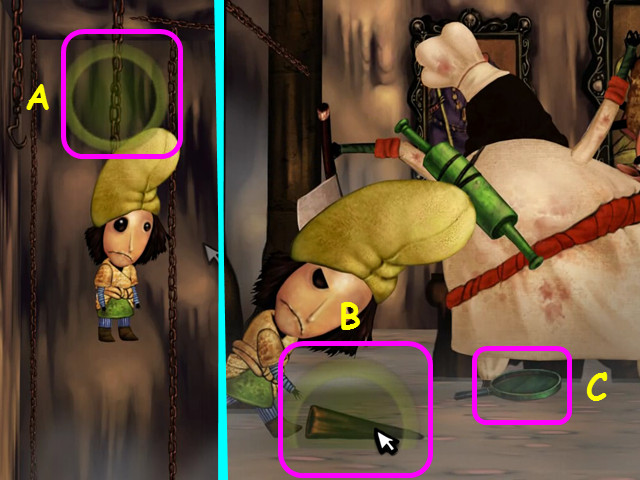
• Select the chain overhead (A).
• Select the stake (B).
• Next, select the pan (C).
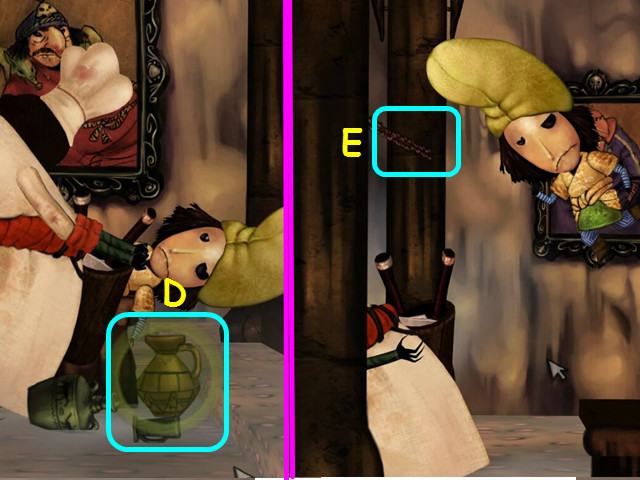
• Select the vase (D).
• Select the chain (E).
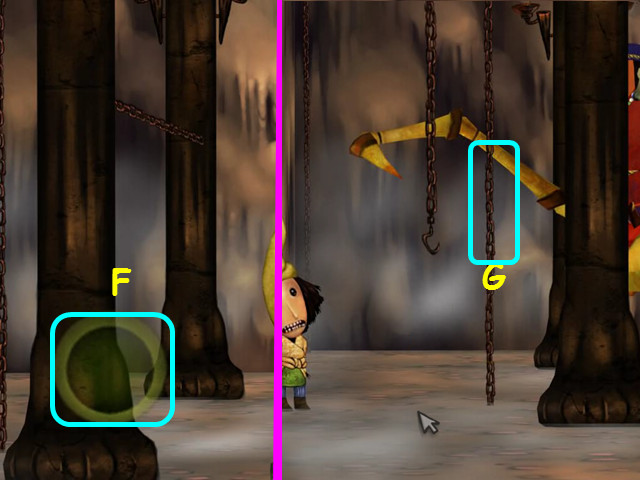
• Select the column (F).
• Select the chain (G).
• Select the joint in the leg (H).
• Select the chandelier (I).
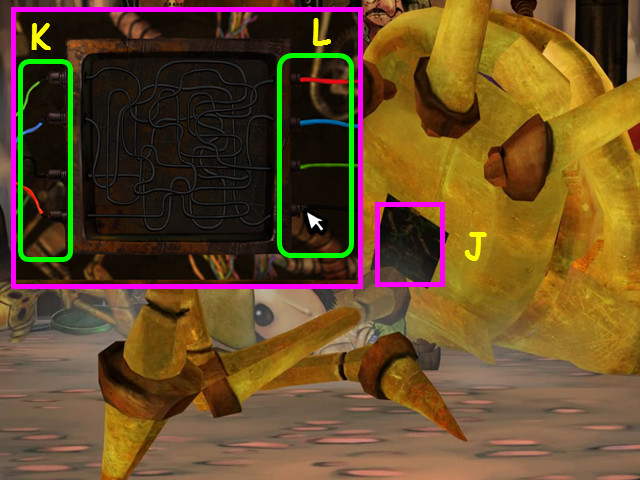
• Look inside the mechanical spider for a mini-game (J).
• Follow each wire on the left (K) to a point on the right (L).
• Place the same colored wire on the end point; left-click to take or place a wire.
• Congratulations! You have completed Shaban!


![rite of passage: the perfect show collector's Edition [FINAL]](https://blogger.googleusercontent.com/img/b/R29vZ2xl/AVvXsEjNKuWnsVEvN2TTwSvhsJ6C7AVk7BPun6TF7sUnfeyoHKi-toV3R_yTo9Rz4K9MWdJrXLevKqjFUeNucdgSfuO-lgaN6Kba8J8vEnh8hX3-qfGMA4cglIgdaJVayzjdYyitBuNL9fZ8/s1600/Rite+Of+Passage+The+Perfect+Show+Collector "Rite of Passage: The Perfect Show Collector's edition [final]")
![Mystery Heritage: Sign of the Spirit Collector`s Edition [FINAL]](https://blogger.googleusercontent.com/img/b/R29vZ2xl/AVvXsEgihVIzHN8GpTRzv4LaJY0QEsoENWseGDs9RmYCkHHnRI5TeGLDWI-UTTJy981bs4hMRJmWZx97USBJquZnRwTqLfZooR8WFhe8T6QC_y71pclpxAZiGD0SP8vvPAe9aLVRyhn6cRWdnYO0/s1600/Mystery-Heritage-Sign-Of-The-Spirit.jpg "Mystery Heritage: Sign of the Spirit Collector`s Edition [FINAL]")

0 comments:
Post a Comment